Tuesday, February 25, 2014

The Potential of 3D Printing in Education

3D printing is slowly becoming a common sight in colleges and universities across the United States. According to an article on the USA Today's website, The University of New Hampshire, University of Alabama, and the University of Illinois at Urbana-Champaign are just three of the many universities that have invested in 3D printing technologies for their students. These universities are helping to pave the way to integrating this technology into classrooms by providing students with the opportunity to learn how to use 3D printing software and technology. These universities along with many others, have created special labs for students to be able to create and share their ideas with others. As 3D printing technology becomes more accessible, smaller universities such as Fort Hays State are now able to join in on this growing 3D printing trend. In our “Maker Space” at Fort Hays State University, we use a MakerBot 3D Replicator 2 printer to bring our various 3D models to life. This printer utilizes a plastic polymer filament that is then heated up and used to create various 3D models. Our lab also includes a 3D scanner along with a with a computer workstation outfitted with various 3D model creation software.

3D printing brings a new level of interactivity to the classroom allowing students to touch, see, interact, and create various 3D models of the many concepts they may be learning about. The following Inforgraphic shows just some of the many ways students can use 3D printing to enhance their learning experiences.


Image take from http://cucfablab.org/

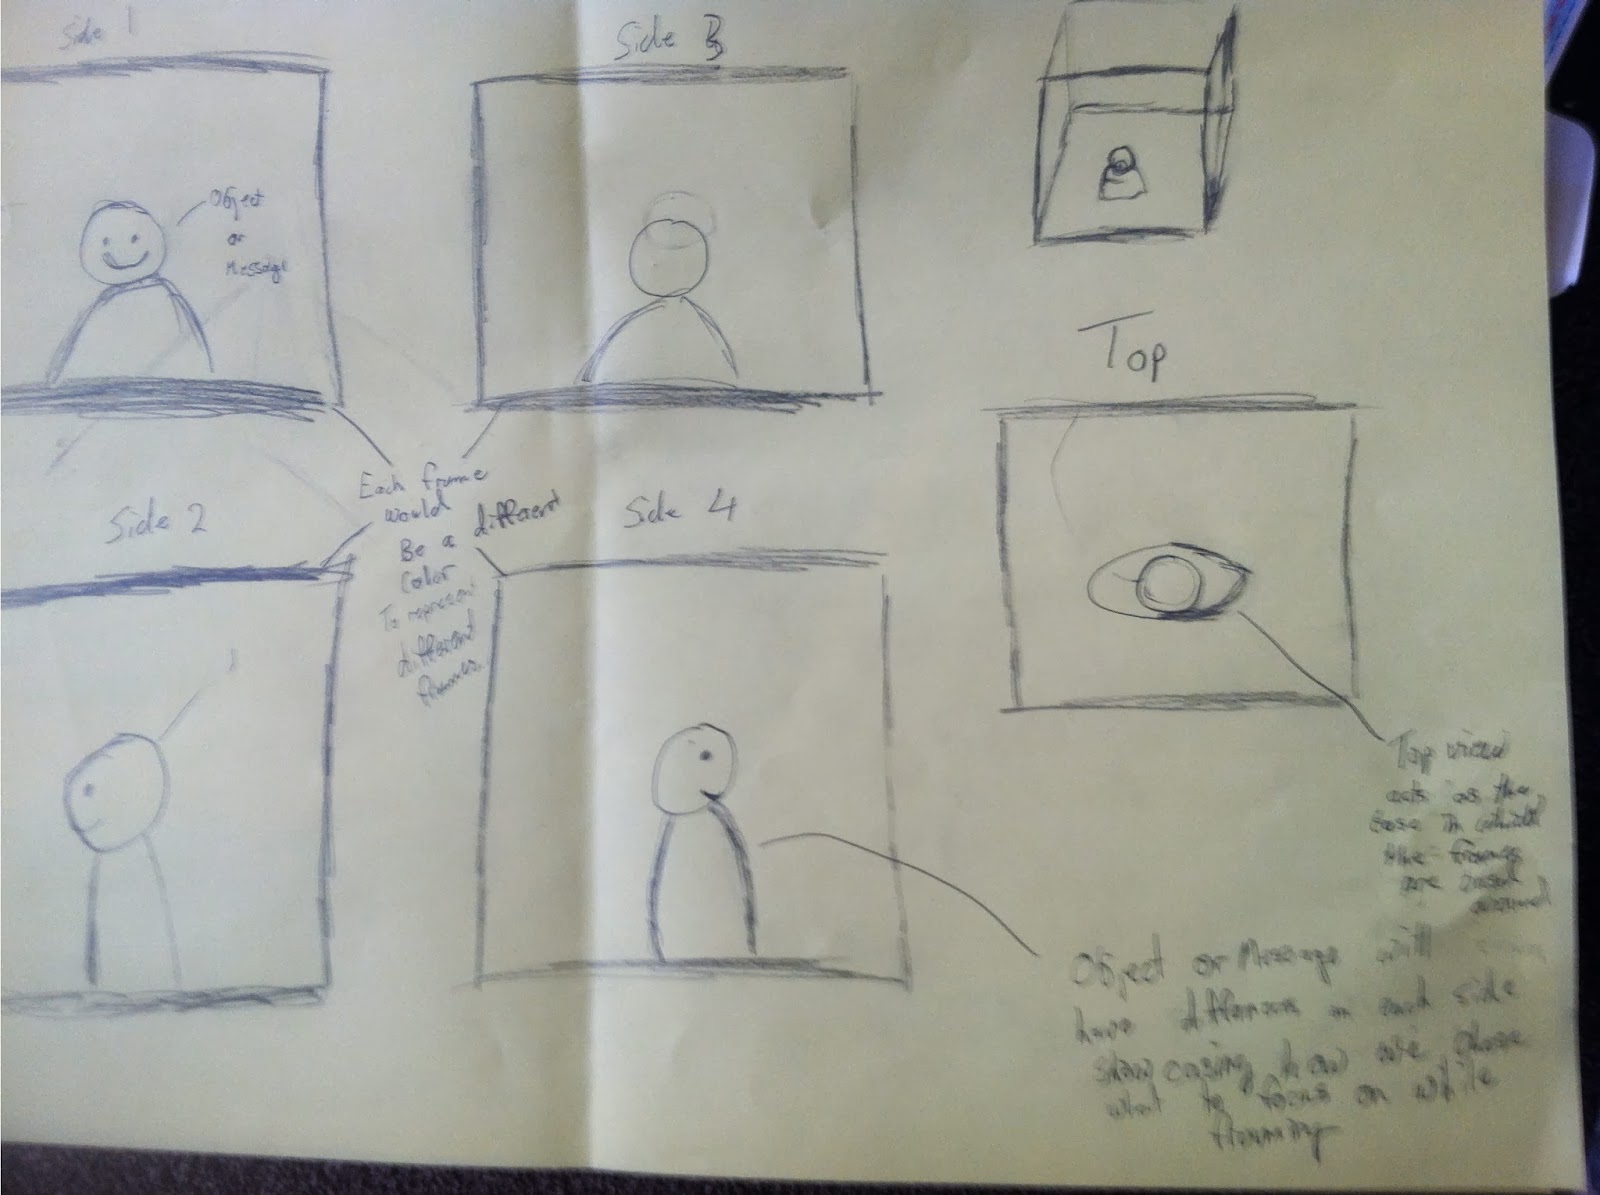
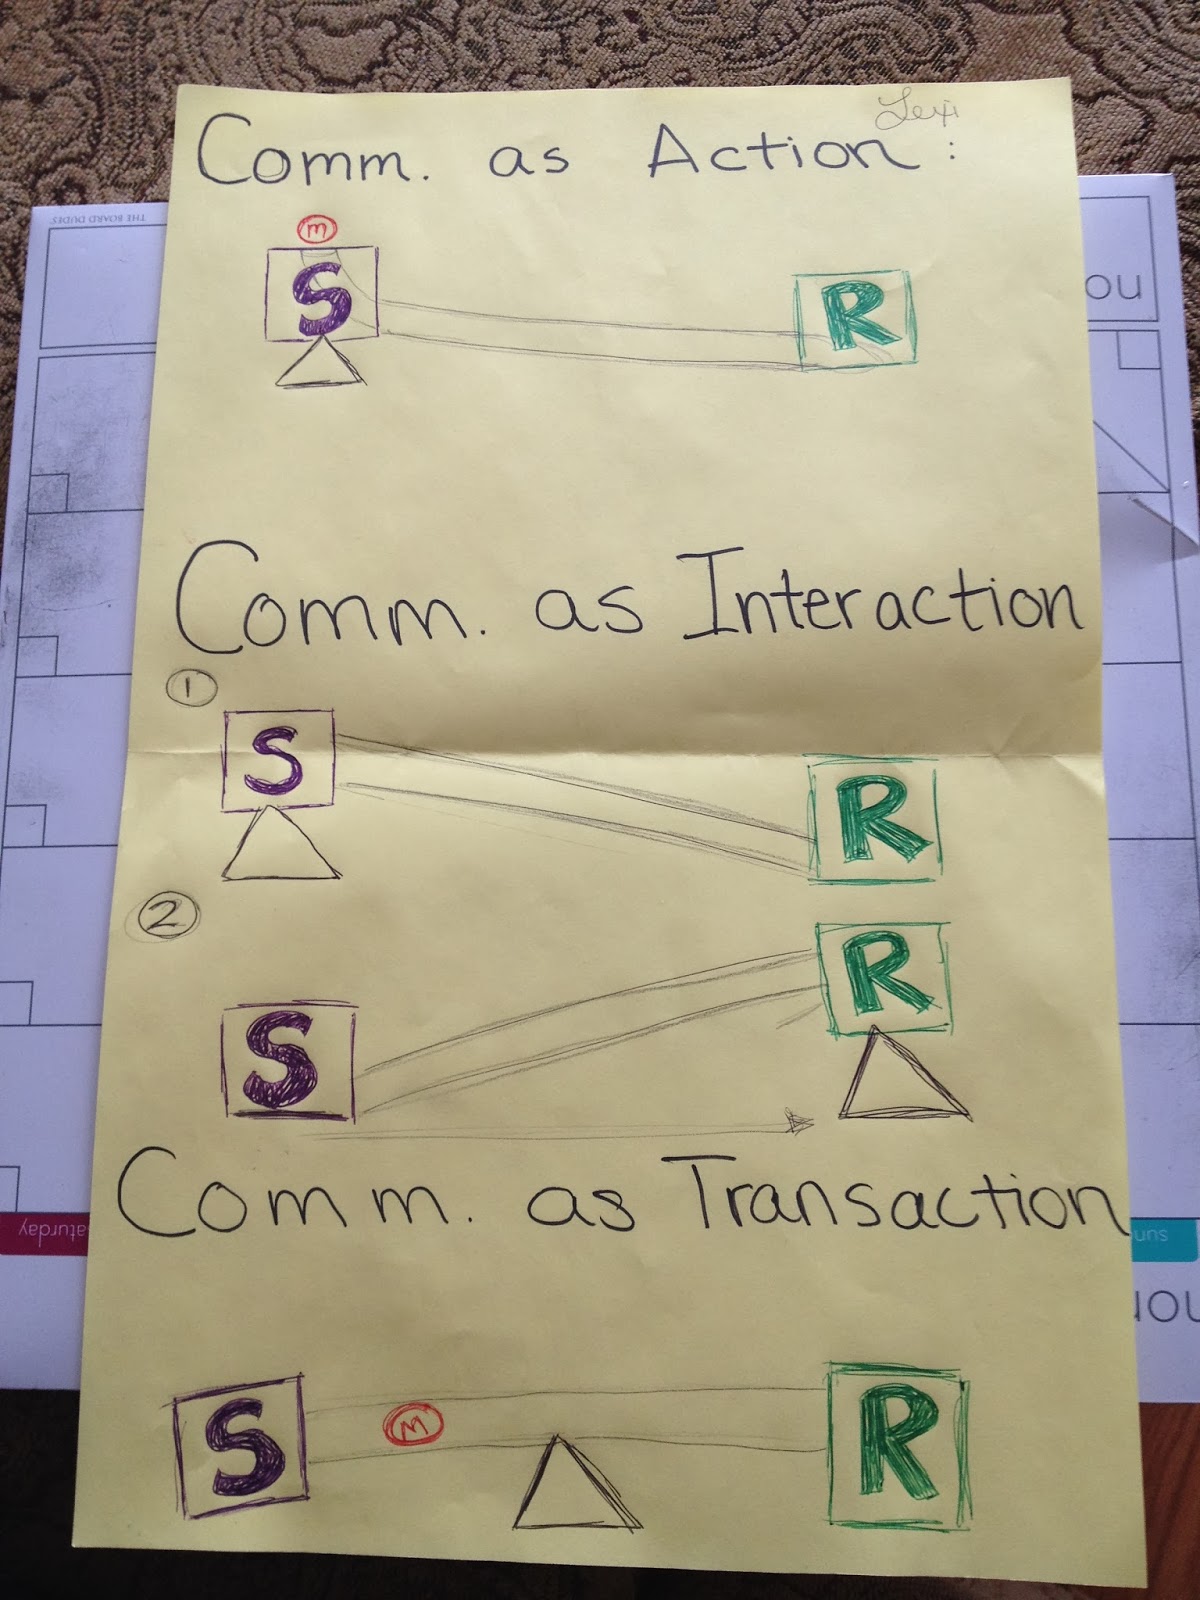
At Fort Hays, various student and faculty members have been using this technology to create objects for educational purposes. The University’s Biology Department has been utilizing the 3D printer and scanner to create 3D models of various insects. Another student has been using Fort Hay’s printer to create various models of Meteors traveling through our solar system. Finally, our group has been playing with 3D printing in order to create educational models to help explain the abstract concepts of communication theory.

As this technology becomes more accessible to students and the public, it will be interesting to see how it will grow and evolve. It’s been exciting to work with this technology firsthand, and our hope is that our findings will help others see the potential of 3D printing in education.

Our GIFT to CKCA

Dr. C and the 3 Dimensionators are working hard on a GIFT to present at the Central states Communication Association (CSCA). GIFT is an acronym for Great Ideas For Teaching. What we want to accomplish with our GIFT is to provide new and better ways to teach communication theory models.

Each of the 3 Dimensionators have chosen a communication theory that they understand and we are working on creating a model that will make it easier to visually understand for others.

We are using a program called Leonar3do as well as a 3D printer to bring our conceptualizations to life. Leonar3do is an easy program to use allowing us, communication majors, to create images and scenes that only graphics majors or engineers would have been able to create in the past. Communication has been taught for years with just word of mouth or simple 2D drawings. We want to show a way to create models in 3D that will provide hands-on learning with the objects that we print off, and provide a better model that a student or teacher can relate to in an easier way than just trying to visualize a theory in their own heads. We want to get rid of any confusion or miscommunication that may happen between student and teacher when discussing a theory so that instead of confusion there can be more progressive learning taking place.

After we create the conceptualizations of the theory that we each chose we may go a few different directions. We may just chose one of the three that we as a group are working on, we may choose two, or we may choose to go with all three of the theories that we have been working on individually. After we decide how many of these concepts to work on as a team, we will team up and create models on the computer as well as print outs of tools that educators and students can use to learn and teach with. We will then present these tools and our work at the Central States Communication Association conference in Minneapolis, Minnesota.

This project will leave a legacy of tools available to the public. Communication theory students everywhere will be able to find our work and use it, build on it, and make it better so that communication studies continues to grow. It is great to be part of something that is laying the foundation for the future of communication studies.

Learn more about CSCA at: CSCA Website


Tuesday, February 18, 2014

Marcella's First Scenes

My first experience on the Leonar3Do software was fun, but more difficult than I anticipated. For the first scene that I was assigned I simply had to create simple shapes and have them interact with each other within the scene. I changed the colors of the objects, and then created parent-child relationships between some of the objects. Parent-child relationships on the Leona3do software mean that you connect two objects with a line. The line represents the relationship and the object that the line is coming from is considered the parent, while the object that the line is going to is the child. If you try to move the child after the relationship is made, the parent moves with it. The parent can still move freely without affecting the child object.

The second scene that I created in this assignment was much harder for me. The assignment was to sculpt an original object on the software. I chose to sculpt a little man that we could use in communication model visualization. That sounds simple enough, right? I started with a simple sphere. I then used the sculpting tool to create arms, legs, and a head. I attempted to sculpt the body so that the body wasn’t so spherical. This sculpting was a whole new experience for me and was much more difficult than I expected it to be. It is a whole new skill to learn. I have never done anything like it so I felt kind of like a young child trying to color inside the lines of a coloring book. I hope to become more accustomed to the software and being able to create more realistic figures.

Drew's First Scenes

This week, our team had our first hands on experience with Leonar3Do. Each of us were tasked to create two “scenes” and to see what we were capable of creating with the software. The first scene I created was simply a set of simple shapes to make sure I understood the basics of the software. Creating this scene was a great way to break the ice, and made the software feel less intimidating to work with.

In my second scene I was given the freedom to just explore the program and to let my creative juices flow. I used a variety of different brushes and tools to manipulate the various objects in the scene and created a 3D logo for our group.


I genuinely had a blast working with the software and I honestly didn’t find it to difficult to pick up and utilize the different tools and settings of Leonar3do. However, I did come to find the control mechanism “The bird” was a little awkward to work with over an extended period of time. The bird seemed to feel unresponsive at times and would act sporadically if it wasn’t in a particular zone of the 3D field. This may have been a sign to recalibrate the software, but it is something I feel I’ll just have to get used to when using Leonar3do. I genuinely had a great time learning this software, and I’m looking forward to seeing what I can create with it.

Lexi's First Scenes

Working with the Leonar3do system for the first time was very exciting. We were
instructed to create two different scenes. The first scene we made plain shapes in order to get a feel for the "bird" controller and the manipulations the program is capable of. On requirement was to have the simple objects be connected so that when you move one, the other followers, but the first object (parent) is still capable of moving freely on it's own.

For our second scene, we were given the opportunity to create our own shape. I wanted to experiment with the sculpting tools in order to make a face out of a sphere. Nonverbals are often utilized within communication acts and are just as important as the words people use. The face I ended up with an expression that could be considered confusion. My favorite part of the character is the eyebrows. I used a tool on the program that scoops out sections of the shape and then one that makes an edge where ever you need it. In the future, I am looking forward to ending up with more realistic figures. 

Tuesday, February 11, 2014

Drew's Process of Visualizing "Framing"

The concept I chose to visualize in 3D is framing.  To summarize, framing is the process of creating abstract “frames” to define or understand the context of a discussion or message.  We create these “frames” by emphasizing the most important or relevant aspects of a scenario and by cropping out the inferior aspects. I chose this particular concept because I felt that this concept would be easy to transition over to a 3D model, however I found out that it was a bit more difficult than I originally thought.

Image 1
While creating my rough draft sketches, I had a clear idea of what I wanted the model to look like. I wanted a cube like structure and in the middle would be a focal point object.  Each side of the cube would then represent a different individual’s “frame”, with the central object representing the scenario or conversation.  The viewer could then move around or turn the cube to see all the different “frames” and what they showed of the object.(see image 1)
Image 2
 I then took this sketch and attempted to create a 3D model with an online Lego building simulator (buildwithchrome.com). Creating the 3D model was an absolute nightmare. First, creating the hollow cube was a tedious and long process. Each “frame” had to be built by creating a wall of Legos, and then removing individual pieces until I had my "frame". After creating my cube I then attempted to build the central object. I went through a multitude of different objects, and had found myself constantly running out of blocks. I finally settled on a heart with the letters L-O-V-E built facing different frames of my cube (see image 2).
I chose this because it didn’t require very many blocks, but also added a sense of continuity between each "frame". My thought process was that the individual could see that each "frame" only showcased a specific aspect of the central object.           
This project was deceivingly difficult, but it was great learning experience. I learned that in creating models you must be prepared to adapt to any technological limitations you may face.

 You can view my final model at 835 SW Polk street Topeka KS, 66612 on buildwithchrome.com.

Lexi's Process of Visualizing Communication Models

When deciding upon which communication ideas or theories to visualize, I chose to focus on what type of visualization we could create that would show more than one concept. In a reading from the text, Communication Principles for a Lifetime by Beebe, Beebe, and Ivy, they simply breakdown the history of communication models. By the end of the chapter communication is shown in three models; communication as action, interaction, and transaction. Communication as action is one-way, when a sender gives a message to a receiver and the communication act is over. The interaction takes place when, after the receiver gets the sender's message, the receiver sends a message back. Finally, communication as transaction shows the ability of senders and receivers to send messages simultaneously back and forth. 

During our last class discussions we talked about creating pieces of a “set” which could be used to exemplify a variety of situations. I envision at least five pieces. One block representing the sender, another the receiver, a tube that can be connected to both, a cylinder to put in the tube (the message) and a “lift” of some sort to manipulate the levels of the blocks. In my drawing I tried to represent the mechanics of each idea and how the separate pieces need to be set up to show the different principles. 

The next step to our visualization assignment was to try and use existing 3D programs. When I attempted to use the Google Chrome’s new application associated with Lego called “Build with Chrome”, the program was not supported on my computer. Once I got to a compatible computer, I created this www.buildwithchrome.com/build/WAR3OAAQA . Obviously it's hard to understand the mechanics of the structure since Legos lack circular shapes, but the basic outline of the idea can be understood. I think these three models of communication are a great jumping off point for experimentation in relation to our project.


Monday, February 10, 2014

Marcella's Process of Visualizing "The Public Sphere"

My process of visualizing The Public Sphere as Historical Narrative by Peter Dahlgren began when we used Tinker Toys to build a 3D visualization of a communication model. The reason I chose Dahlgren’s model of communication is because the idea of public and private spheres of communication really resonate with me. I like the idea that there are different spheres of communication, public and private and that you can be part of more than one sphere, public and private.

While working on this project, I started with a 2D sketched idea on plain paper (see picture). I then took this idea to www.buildwithchrome.com. I struggled a little bit with this part of my project because my model is supposed to be spherical, and legos do not necessarily lend themselves to circular shapes. I actually created a couple of different lego models because the first one did not seem just right. The second build is not exactly what I was aiming for either, but I think it got closer to reaching the goal.

With my lego built model, I used color and space to portray the communication model. In the second build that I created I decided to just make squares instead of trying to make a spherical shape. In both the first and second build that I created you can see where the “spheres” overlap the colors blend. I used primary colors for the main spheres and secondary colors to show that they combine where they overlap. That means a person’s private sphere can overlap into the public sphere, a smaller public sphere can overlap with a larger public sphere, and then in the corner of the build you see there is a secluded “sphere”. The secluded “sphere” is a completely private sphere. A person who is not in the public sphere at all would have a private sphere like that. That could also represent part of a person’s life that they keep only to themselves.

If you would like to see my builds check out 612 Southwest Tyler Street, Topeka KS and 704 Southwest Tyler Street, Topeka KS on www.buildwithchrome.com.

Wednesday, February 5, 2014


Dr. Gordon Carlson of the Communication Studies department at Fort Hays State University in Hays, KS is leading three communication students in a exciting new project this semester. The students participating include senior, Drew Waecther of Ulysses, KS,  junior, Marcella McCluskey of Great Bend, KS, and myself, senior Lexi Copeland of Hays, KS. 


We will be experimenting with 3D technology in an effort to discover its usefulness in an academic arena. Visualizing concepts and communication theories will be our main focus, with the help of 3-dimensional printing and software called Leodar3Do. This software allows for the creation of 3D virtual objects, while the printer has the capabilities to print the objects into tangible models. Our objective is to see how these technologies could aid universities when it comes to teaching complex topics.

We will be reporting our progress throughout the semester here and will have the opportunity to present our work at the Central States Communication Association's "Elevate" Conference in Minneapolis, Minnesota on April 5th.
The use of this cutting edge technology puts Fort Hays State University into a league of future education development that is worth being aware of.