Saturday, March 29, 2014

Marcella's First Comprehensive 3D Project Process

               I did my first comprehensive 3D project over the theory of agenda setting.  To complete this project I broke it down into seven steps.  Those steps included choosing a concept, conceptualizing the chosen concept in 2D, creating a 3D scene in the Leonar3do program that portrayed the concept, animating the concept in the Leonar3do program, converting the animation into an educational video, printing out the 3D objects from my concept, and presenting my work to my class and mentors.  In this blog post I will take you through those steps and help you to better understand the process that I went through while working to complete this project. 
               Step one was to choose a concept.  I went to www.sclcr.com and searched the toolkit.  In the toolkit you can either search key words or look through all of the concepts listed.  I chose to look through all of the concepts because I did not really have an idea of the one that I wanted to use at that point.  I looked through quite a few before I settled on the agenda setter theory.  I chose the agenda setter theory because I could conceptualize it in my mind.  I thought that if I could conceptualize it in my mind, it may be easier for me to translate the concept into a 3D scene.
               Step two was to plan the concept by drawing a blueprint so to speak.  During this step I drew what I planned to create in 3D.  I drew the scene that I planned to make from the top view and the side view. I labeled all of the parts I planned to create as well.  During this step I also wrote about my plans to turn my concept in to a 3D scene.  That write up can be found in my previous blog post entitled Marcella's Work on her Comprehensive 3D Project.  This write up helped me to explain my concept as I would to someone who had never heard of it.  This planning step set me up to create a 3D scene.
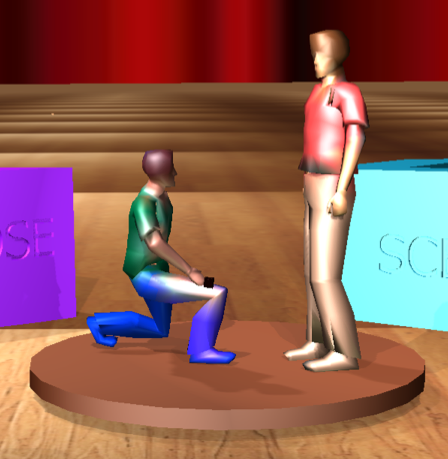
               Step three of my process was to create my concept in a 3D world.  I used the Leonar3do system
to create this scene.  I imported an .OBJ file from a third party website called turbosquid.com.  I also used imported .PNG files to represent different aspects of my scene.  I built objects from primitive shapes, sculpted objects, and used the subtraction tool to create the objects that I needed to complete my scene.
               Step four was to transform my 3D scene into an animation that portrayed the agenda setter theory.  During this step I also used the Leonar3do system.  The Leonar3do system has a feature that allows animation of objects.  By using this feature I was able to manipulate light, camera angles, and objects in order to portray the agenda setter theory. 
               Step five of my process was editing the animation into an educational video with narration and pausing to adequately portray the concept.  During this step I used Windows Movie Maker.  This was my first experience editing video, and I am proud of the outcome.  Windows Movie Maker was fairly easy to use, but I think next time I have to edit video I will try another video editing software so that I get experience with other software. 
               Step six was to print the objects from my 3D scene with a 3D printer.  I am fortunate that Fort Hays State University has extremely advanced technological resources.  I was able to load my .OBJ files onto a 3D printer and let the printer create physical objects that can be manipulated by the user in real time and space. This step is crucial because it allows individuals to manipulate these objects and learn about the agenda setter theory by doing so.  These printed objects could be used in a classroom setting or by anyone wanting to better understand the agenda setter theory.  These objects are available for download at 3D Concept Visualization Google Drive.
         
      Step seven was to present all of my work to my class as well as some of my mentors at Fort Hays State University.  In order to present my project I decided to put everything into a power point presentation. During my presentation I took the viewers through the same steps that I am writing about now.  My hope throughout the presentation was to show how easy use of the Leonar3do equipment and the 3D printers is. 
               The next step will be to attend the Central States Communication Association’s Elevate conference with my classmates and instructor.  At this conference we will present our G.I.F.T., great idea for teaching, and attend workshops. This year the conference is in Minneapolis, Minnesota. 

               This process has been intense and a lot of work, but I have learned so much about not only the technology involved but also the different communication theories my classmates and I portrayed.  After finishing this project I am excited to work on the next project like this because I want to put the skills and knowledge that I gained from this project to the test.  

Lexi's Comprehensive Concept Project One

I began researching possible communication topics at www.sclcr.com. Here you can find a database under the “Toolkit” section with a large amount of summaries and explanations for different theories. For my project, I chose to work with Kenneth Burke’s Pentad Theory (1945) which aids in examining rhetoric or text. By using five elements, act, agency, agent, scene, and purpose, one can attempt to understand or even create a meaningful communication act. Act refers to what is happening in the scene, agency describes how everything is being carried out, the agent is who is carrying the act, the scene is where and when the situation takes place, and the purpose is why the act were done. I initially figured I could easily represent these parts of the theory using the Leo software because they are simple to show and manipulate. However, I misunderstood that the Pentad theory is more concerned about how these elements are used to figure out the motivations of the speaker or writer more than they are used as catalysts for what is being described. After realizing this, I had to reevaluate my originals ideas. 


Eventually, I decided it would be best to set my scene up like a debate, to show that using the Pentad theory is helpful when analyzing people’s perspectives of cultural topics such as legalization of drugs, vegetarianism, global warming, etc. An issue with two clearly differentiating sides is gay marriage rights. I showed how the motivations of a supporter of gay rights would be obvious by the choices they make to describe a narrative involving a man proposing to another man, and the same would be true for the alternate view. 

The video I produced using the Leonar3do system as well as the LeoWorld software displays how the elements can be used to critically analyze arguments.

 
Part of the assignment for my visual
interpretation of the theory included making elements that can be printed out three-dimensionally in order to help teach the theory to others. Created using Leonar3do and LeoWorld systems, these objects help to depict the five elements as well as allow for demonstrations of the theory at work. The main item related to the theory is a pentagon “ring” that displays one of the five parts of the pentad on each of its sides. Next is a podium to represent the presence of a “speaker” or “perspective”. I then created a thought bubble in the scene and an object that identifies the speaker’s point of view. Whatever the speaker and text is discussing, should be represented as well. I imagined a narrative about a same sex couple, so they are shown as well. However, part of the activity is that students need come up with their own scenario or find a speech or text that could be described and analyzed using the pentad theory. They then can use the pentagon shape to find the elements within their chosen act, and decide whether the argument or perspective can be easily understood as a communication act. 

The functionality of my scene’s printed objects relies heavily upon facilitating the process of Pentadic Analysis. Rather than just reading a text, hearing a speech, or looking at an image, these pieces help visualize the analysis. It is actually more difficult to go about understanding the Pentad Theory this way, and by the end they should know more about it and be able to explain it better since they have worked through all the manners in which it can be described. By setting up an ambiguous representation of a speaker and using the pentagon pentad, they can identify the five elements in Burke’s theory to examine the rhetoric. This is important because it exemplifies how Burke’s theory can be utilized as a critical thinking tool. Being able to recognize the act, agent, agency, scene, and purpose behind a message allows for better decision making in order to decide whether to absorb or reject the information in a useful way. My objects are available for download in the .obj format at: 
https://drive.google.com/folderviewid=0B0fIsxtWF8N_a05TMkpRNU9JOFE&usp=sharing

I learned a couple notable things throughout this particular assignment. Using Leo to illustrate this theory really helped me understand it better than I had when I only read the summary of it. At first, I misunderstood the function of it, and after having to actually see the idea somehow in my mind and think about showing it in a way it could be easily shared with other allowed me comprehension beyond what I initially received.The one thing I was not anticipating was how long completing this entire project would actually take. Each session I had working with the Leo system lasted no shorter than three hours, and that is with little trouble-shooting, so any larger set back with the technology caused me more stress than if I had planned out my time more efficiently. So for our next comprehensive assignment, I will better prepare for that consideration.

Drew Waechter's First Comprehensive 3D Assignment


Over the past few weeks, my group members and I have been working on our first set Comprehensive 3D projects. We were tasked with creating two types of classroom aids that could be used to help explain a communication studies concept. These were an animated video and a set of 3D printed objects, and both were created using only the various 3D technologies we had available. I hope that by sharing my experiences in this project that I can demonstrate the potential of this technology in education.

Before I could start creating my various learning aids, I had to find a communication concept to visualize. To find my concept, I used an online database provided by the Society for Conceptual Logistics in Communication Research (SCLCR). It took me awhile, but I finally chose to visualize Zizi Papacharissi’s concept of “The Networked Self”. I chose this concept because I felt that it would be a fun challenge to try to convert something fairly abstract into 3D. I then spent a few days to research and make sure that I fully understood the concept. Once I felt confident enough, I then started designing my learning aids.


After finding my concept, I was then able to start creating my video. To prepare for my video, I spent a fair amount of time sketching out a blueprint of my model and a creating a storyboard for my animation. Creating this blueprint was

absolutely vital as it allowed me to thoroughly plan out my model and animation in advanced. Having this strong foundation was quite useful and it helped me to get the most out of the time that I spent in Leonar3Do. The model creating experience was quite fun and was probably my favorite part of the whole process. I enjoyed building my scene and adding the little bits and pieces together to create my vision.


After creating my model with Leonar3Do, I then used the animation features in the LeoWorld software to bring the concept to life. Honestly, I would have to say that animating was the most difficult and time-consuming part of this entire experience. In my first animation attempt, I developed a bad habit of nitpicking and over adjusting each frame of my animation. I made so many adjustments, that by the time I completed my animation it didn’t even remotely resemble my original storyboard. After seeing how confusing and jarring the animation was, I then decided to scrap the whole
thing and start fresh. My second attempt in animating was a much more successful. I forced myself to strictly follow the storyboard I had created. This not only kept me calm and focused, but it prevented me from wasting precious time. I then allowed myself a day away from the computer and returned the following day to edit with a fresh mind. This greatly increased my productivity and within a few hours I was able to finally finish my animation. With my animation complete, I then added narration and edited the footage in video editing software to create an educational video of my concept.

The second half of this project was to create tangible objects from my scene that I felt would be useful in a classroom setting. These objects would need to be able to be shared with the general public and easily printable with a 3D printer. The objects I chose were my humanoid token and a speech bubble. My idea was that students would be able to use these object to create and map out their own networked selves in a classroom. This would allow students a chance to visualize the concept and give them opportunity to apply what they’ve learned.


I also chose these two objects because I felt that they could be used to help visualize other communication concepts. I think it would be interesting to create a set of universal objects in which an instructor could pull out at any time. That way they could have a kit of sorts to demonstrate various communication concepts and theories. With that in mind, I created my objects to be simple enough that anyone could take them and customize them for their own use.

After completing this project, I feel that 3D technology is a powerful tool in the classroom. Whether it is creating a 3D video or model or using tangible 3D objects, I feel that 3D provides rich a learning experience for students. From my own personal experience with this project, I feel that I’ve been challenged to think and perform in a way that feels far more rewarding than simply listening to a lecture. I feel like I’ve been given the opportunity to use my creativity and critical thinking skills to fully immerse myself into a communication studies concept.
 I’m excited to see how this technology will change  education in the years to come.

 If you would like to use any of the objects created in this project feel free to click here for all of the items our group has created so far.

Thursday, March 20, 2014

Preparing My G.I.F.T For CSCA


In preparation for this conference I have been busy over this last creating my second concept model in Leonar3Do. For this model I chose to create a model of Zizi Papacharissi’s concept of networked self. If you’d like to read more about this concept, then feel read to the following article here.

 I’ve made a lot of progress on my model during this last week. On Tuesday I was able to create my primitive shapes and figurines with Leonar3Do Today I then started messing around with the layout of my model. Currently, I’m in a bit of a standstill with my model. I’m trying to find some pre made OBJ objects to incorporate into my scene. I’ve been looking on various sites, but there are so many different options that I just need to decide what type of object I want to use. Once I deicide on an OBJ, I will then be able to start animating my scene. My goal is to start animating by this weekend so that I will be able to have enough time to edit together a short video of my concept.

The more I’ve worked with the Leonar3Do the more I’m starting to enjoy it. With each passing week it becomes less intimidating and much more exciting to use. I’ve found myself experimenting more with the software, and trying out different ideas as I’m building my scene. I’m still having a few issues with the software, but I’m at the point in which I feel that I can watch a tutorial video and work my way through any problem. 

I’m excited to see how this project will turn out. I’ve put a lot of effort into the creation of this second model and I hope that it will be intriguing to those at the conference.

Marcella's Work on her Comprehensive 3D Project

I am working on my first comprehensive 3D project, and I have decided to conceptualize the agenda setter theory. So far I have begun work on my scene. I created the agenda setter and have put a tunnel through its head so that I can drop the ideas through to the tunnel. The tunnel will be created using a sphere and five or six cylinders. The objects representing society will be represented by OBJ files. I have begun searching for free OBJs and ran into a problem when I imported one. It had a large disk around the bottom of it that I could not delete. I will have to search for different one and see if I can get rid of that problem.

The rest of my process will include completing my scene, creating an animation and making a video to narrate the concept. I will then present my concept and project to a group of communication studies professors and my peers.

This project is making me excited for the Central States Communication Association’s Conference because I know I will have something to be proud of to show to the attendants.

Tuesday, March 4, 2014

Animating Communication Models

My first attempt with animation helped me gain a little bit more experience with Leonar3do. For my communication theory scene I created three sets of a cone, two different colored rectangles, a yellow tube, and a ball to fit the tube. Each set represents the elements that can be used to depict communication as action, interaction, and transaction. One rectangle is the sender, one is the receiver, the tube represents the channel of communication between them, and the ball is the message. The cone is used to manipulate the level the rectangles rest at in order to show how the "message" would fall. Here comes the benefit of the animation tools within Leo because I can now show the actual trajectory of the message ball as it is intended to be displayed. For communication as action, the cone sits under the sender block so it is higher than the receiver block, and then the tube rest atop it. Then the green ball falls from the receiver side down to the sender side. To visualize communication as interaction, the cone just can be shifted back and forth from the receiver and sender as they send messages to each other one after the other. Finally, the transaction model places the cone under the tube so that it teeters between the receiver and sender, causing the ball (message) to move precariously between the two.

When it came to the logistics of the animation functions, I struggled a bit at first, but I think that was mostly because I missed our group meeting when Dr. Carlson went over the basics. After a short tutorial video, I finally started to get the hang of it. In Drew's previous post he mentions the inconvenience of having to switch away from the animation toolbar to access other functions, and I agree with his frustrations. I am more used to how Adobe programs are set up with the ability to view multiple task windows at one time and prefer working that way.

Animating Private & Public Spheres

Creating an animation of my communication model was a fun experience. I really enjoyed the creative process. I used the same concept with the public and private spheres to make my animation. I created a large public sphere, a smaller public sphere, a private sphere that overlaps into the public sphere, and a completely private sphere. I also made a group of little people to show the way that people are dispersed. I made the smaller public sphere and the private sphere that overlaps into the public sphere merge with the large public sphere to show that public and private spheres can interact with each other. The completely private sphere does not come in contact with any of the other spheres.

I decided to use the animation tools on LeoWorld to show the spheres and the people within the scene moving and interacting with one another. The spheres start the scene all separate. The people in the scene begin in the middle of the scene, not apparently part of any social spheres. The first animation that I added to my scene was moving the spheres to their correct locations within the model. I made the smaller public sphere and one of the private spheres merge with the large public sphere to show that public and private spheres can interact with each other. The completely private sphere does not come in contact with any of the other spheres. The next animation moves the little people to their respective spheres. There is one person in the two private spheres and more people throughout the two public spheres. Within the next animations the little people move within the spheres, the person from the completely private sphere moves into the public sphere, and the person in the private sphere that is partially in the public sphere moves farther from the public sphere.

So far the animation of my scene has been my favorite project.

Animating the Concept of Framing


Having no past experience with animation, I was a little bit nervous going into this assignment. To my surprise, I found that the animation tools in LeoWorld were actually pretty easy to pick up and use. The interface mostly revolves around the use of a timeline (see image). On this timeline, you set various keyframes and the computer then animates the scene based off of the changes made between these keyframes. This allows for the user to create some cool effects, such as the camera panning across the screen or having objects fall into place. I also found that in LeoWorld, you can apply physics to the objects in your scene. While my model wasn’t designed with the use of physics in mind, it was still fun to watch my creations bump and crash into one another in this virtual space.

While I did have a lot of fun, I quickly learned that animation is a slow and tedious process. It took me approximately an hour to create my six-second animation, with the majority of my time spent learning the various tools and keybindings in LeoWorld. Once I had a grasp on the various tools, I was able to start working at a fairly decent pace.
 

The only complaint I have in working with LeoWorld is the lack of a convenient way to use any of the other tools without leaving the animation tab. It was a bit annoying having to switch between tabs if I needed to tweak or add anything into the scene. In the end, I managed to pull something together and I’m happy with how my little animation turned out.